Friday, June 27, 2014

Kamado Joe - Cheap Night - BBQ Drumsticks & Asparagus Spears


If you are ever looking for a nice quick and cheap meal, there is no better place to start then a flat of chicken drumsticks and some asparagus spears.. add a side salad and you are still under $10 to feed 2-3 people

Drumsticks have always been a crowd pleaser and until this day I still favor them over most other cuts of chicken.. on the BBQ anyways. here is a quick flavourful meal for any night of the week.


Set up your Kamado for indirect cooking, if you have the Divide and Conquer model you only need to set up one side for indirect and leave the other open for direct.. I do this so I can add a quick blister to my veggies and chicken at the end of the cook

Shake down and rub your drumsticks with your fav rub (or just salt and pepper)


Depending on the size of your drumsticks they will take between 45 minutes to an hour to cook. In a Kamado they stay nice and juicy so there is little worry of slightly over cooking them


At the 45 minute mark I sauce the drumsticks, turn, re-sauce, turn re-sauce and then move to direct heat to add a bit of blister to the skin and caramelize the sauce… then move them off the grill to rest


For my Asparagus, I usually finely chop cilantro, juice a lemon and toss it all in olive oil, and let it  marinate while the chicken is cooking. Just prior to hitting the grill I hit it with some salt and pepper and place them on my veggie skewers

And since I know you'll ask, you can find these veggies skewers  HERE

Asparagus does not take long over charcoal and since I like mine a bit softer then most I will not give you a time here, just keep moving them and you will until they are slightly blistered, soft internally and still have a nice snap when broken


There you have it, a quick cheap and relatively healthy meal on your Kamado in under an hour


Sauces & Rubs

(1) Ted Reader "Bone Dust"
(2) Guy Fieri "Kansas BBQ Sauce"

Heat Source & Tools

(1) Basques Natures Own (green bag) Charcoal 
(2) Kamado Joe Heat Deflector (half)
(3) Veggie Raft Skewers

Monday, June 23, 2014

Kamado Joe - In search of the perfect Pizza - Attempt #2


After my disastrous first attempt at pizza on the Kamado, I stepped back, looked at my mistakes and then started fresh… key word "Fresh" meaning I made both the dough and the sauce from scratch. Both of the recipes I used can be found below. I will state now that I was not super happy with the crust, but this quick and easy sauce had some good flavour, though it tastes much like the canned sauce I can get at most local grocers.

All in all this cook was better then cook 1, but still much room for improvement.. here are my findings:

Mistake #1 on this cook was not resting the dough over night, I allow it to sit for a good few hours, but I should have made it early and left it overnight like almost all recipes call for. This may have been the reason it was harder to stretch and did not bake up as nicely as I had hopped.

Mistake #2: once the BBQ got up to 500 degrees I dropped in the heat deflector at the lower level and place the pizza stone on the main grill.. almost immediately I noticed my temp stopped climbing and we I had a really hard time getting it up over 550 degrees.

Mistake #3: I allowed the pizza stone to climb up to 544 degrees but since the BBQ was not much hotter I decided to just toss on my pizza. This made for a much slower cook then I had hoped for, and the crust was left this nasty white colour and not the golden brown I was looking for.


Tip #1: As mentioned above I left the pizza stone on the top rack, which was nowhere near close enough to the top of the kamado to get that quick cook on the cheese and toppings. This really was a slow bake not at all what I was looking for in a finished product. Buying an extender rack will help with this issue and get your pizza up nice and high

Tip #2: when trying to learn a new cooking technique, your best to keep it pretty simple. This is why I have been making margherita pizza, which is simply dough, sauce, cheese and basil. Once I have this nailed I will start to experiment further.


Sauce & Dough

(1) Easy Pizza Sauce 1 (allrecipes.com)
(2) Classic NewYork Style Pizza Dough


Heat Source & Tools

(1) Natures Own by Basques Charcoal 
(2) Kamado Joe Pizza Stone
(3) Kamado Joe Heat Deflector
(4) Infrared Temperature Gun


Thursday, June 19, 2014

Kamado Joe - Memphis Fried Egg Burger


While walking the butchers counter trying to decide what I wanted for dinner I watched one of the staff come out from the back and lay down a stack of burgers for the customer ahead of him in line..decision made.. once burgers are on the mind there is only one way to get them off…

This is my second burger cook since becoming a Kamado Joe owner, and since my first cook was right on the grill, full flavour, I decided to test out what a burger cook would be like using my grill grates.


I lowered the racks and got the fire up to about 400 degrees fairly quickly.  Once there I  put the grill grates in place and then gave them a minute to heat up (i wanted that grill grate sear)


before putting the burgers on, I gave the grates a temp check with my new toy, an infrared thermometer gun.. ah, so close to  500 should make this a quick cook, leaving the meat juicy


Thats the marks I was looking for.. once fully cooked I added some shredded aged cheddar and gave it a minute to melt (lid closed). To finish this burger up, I placed sliced picked (Nathans) and a home made BBQ sauce I picked up from serious eats.com (see below link).. to top it off I added a sunny-side-up fried egg

Burger fix officially accomplished


Sauces & Rubs

(1) Memphis Style BBQ Sauce (seriouseats.com)


Heat Source & Tools

(1) Kamado Joe (red bag) Charcoal 
(2) Grill Grates 
(3) Infrared Temperature Gun


Sunday, June 15, 2014

Kamado Joe - My First Brisket


Once you buy your first smoker you know it is just a matter of time before your start doing up briskets, ribs and other low and slow cuts of meat that these bbq's excel at. Once you have the smoker, all you need next is the time, and this past weekend I had just that


On Friday night on my way home from work I swing by a local butcher shop to see if he had any briskets left. Lucky for me he did, and was willing to cut the flat off for me, as the 4lb was more then enough for my wife and I, and the full brisket would simply have gone to waste.

Once home I gave the brisket a once over with my knife removing any excess fat


Once trimmed up it was time to give this beast a rub down. I use the rub from Muddy's Pit BBQ in Keene, Ontario, they are on of my favourite places to eat and their rub and sauce are simply amazing.

Once rubbed down I made some slits in the fat cap then wrapped the brisket in plastic wrap and stored it in the fridge over night


On Saturday morning I was out of bed at 7:30 (ugh) and had the Kamado heating up to a temp of 250. Once there I tossed in 4 chunks of Nature's Grilling  hickory and placed my heat deflector on the grill and positioned a drip pan under my brisket. I instead a digital thermometer in the meat in order to keep an eye on the internal temp


Nearly 4 hours into the cook, this is what y Brisket looked like. It was now hovering around the 150 degree mark and fully stalled, so I headed some advice I read on-line and wrapped it up in tinfoil and placed it back on the grill.


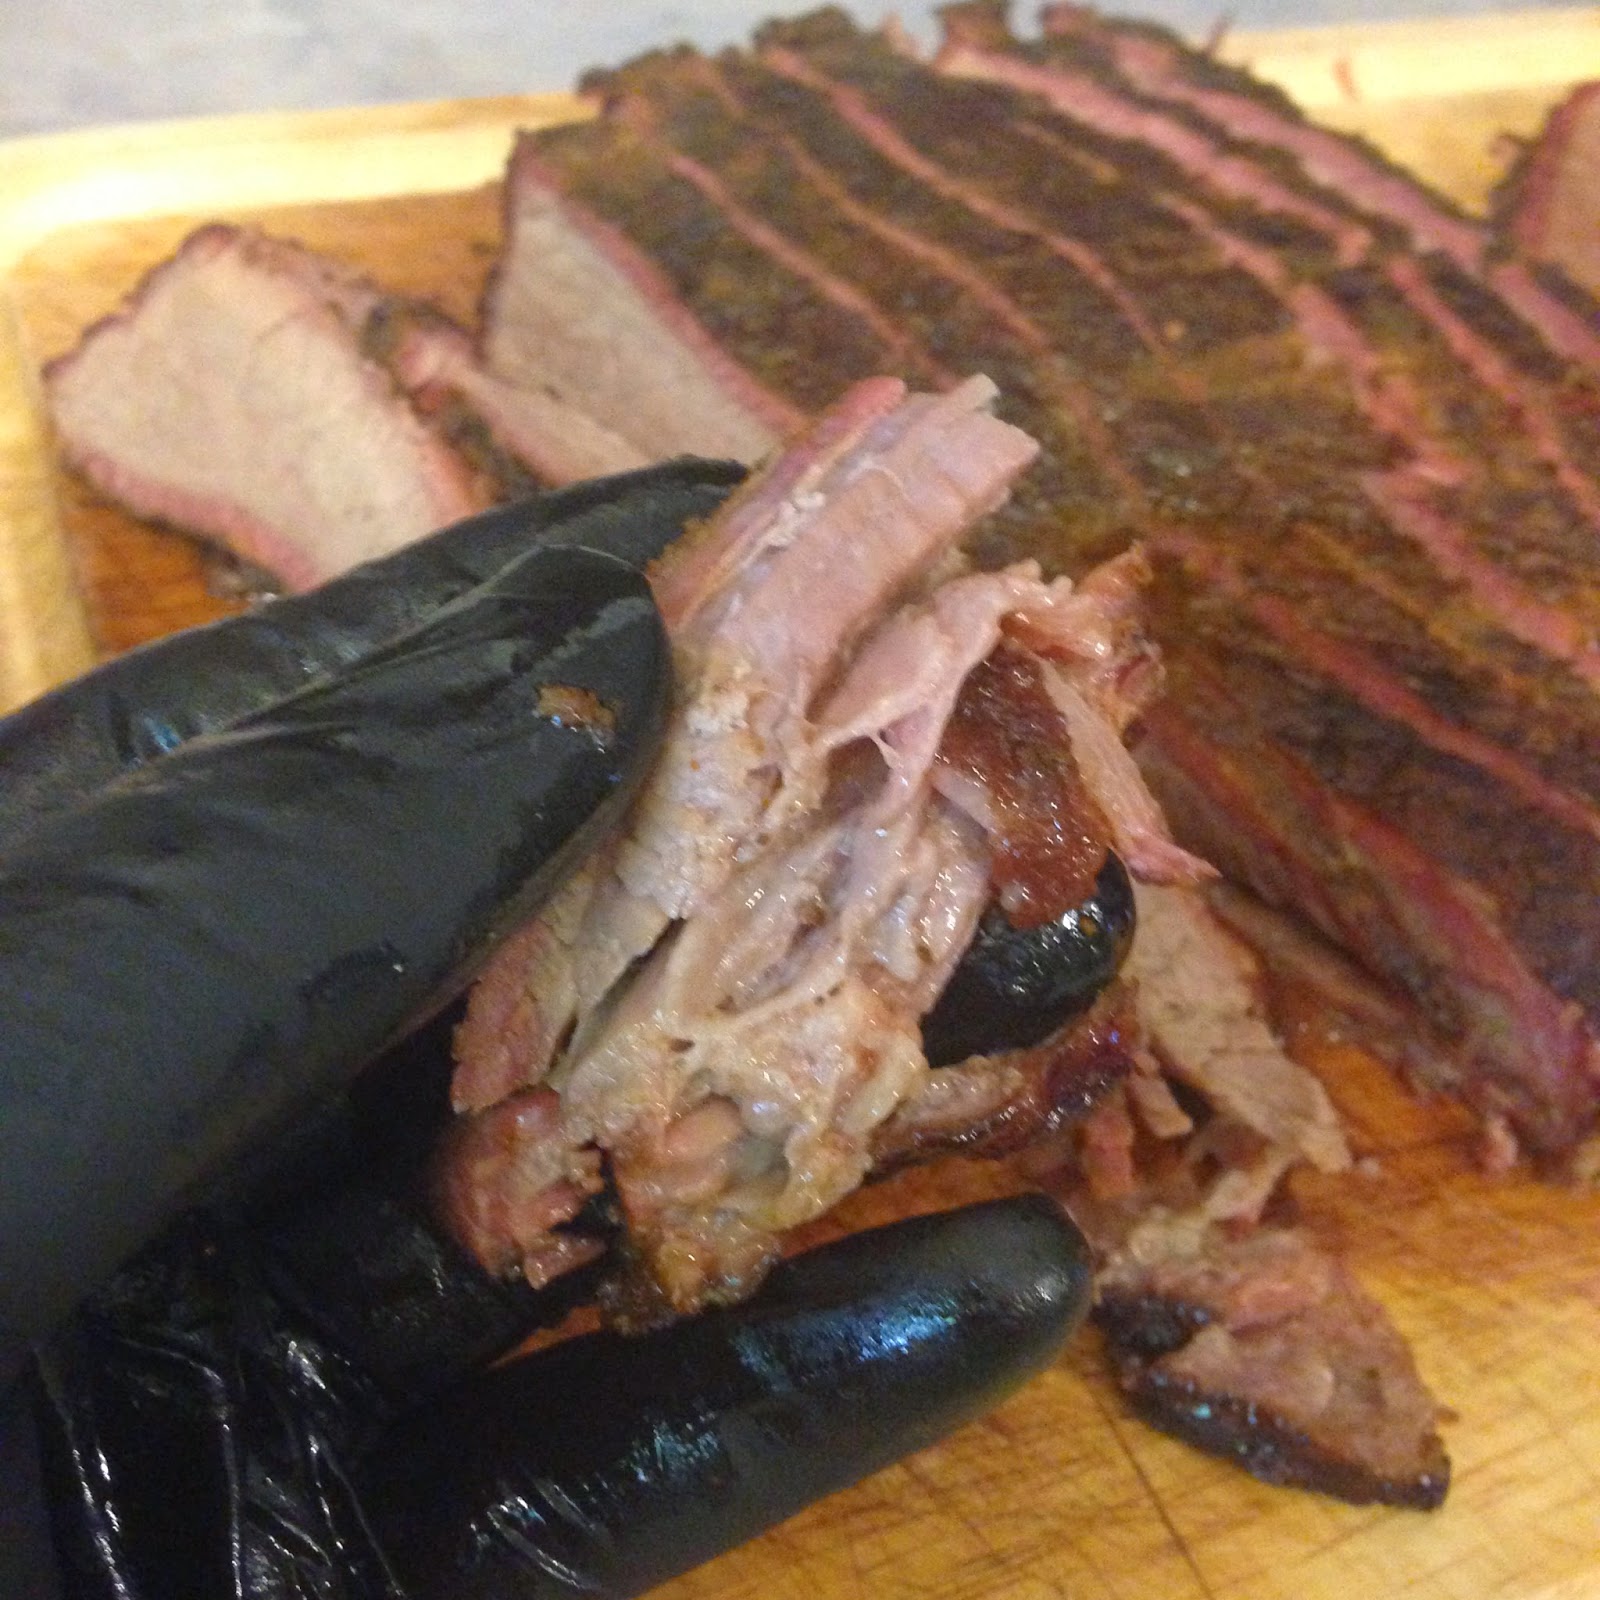
Just after 5pm my brisket finally broke the 200 degree mark and was ready to be pulled. Again heeding advise I quickly added some apple juice to the brisket, re-foiled it and then wrapped it in a towel. Once cozy I placed it in a cooler bag and zipped it up tight


One and half hours later my brisket was ready to cut and of course EAT!


Lesson/Tips:


(1) Being my first low and slow cook I had some trouble keeping the temp at 250 or under, so in the first hour I was chasing temps as high as 300 and on average 275. I believe this was often due to not letting it fully adjust and settle in prior to tweaking the grates, more patience would have allowed me to settle in quicker.

(2) I found my brisket to be slightly dryer then I had hoped, during my next attempt I will try filling my drip pan with water to add moisture during the cook.

(3) Foil Wrapping is very helpful, that stall period around 150 degrees lasts a long time, foiling the meat will kick start it and help keep some juices in while you cook.

(4) My smoke ring was perfect (if I do say so myself) but the bark could have used some help. I'm wondering if this is because I did not use oil or mustard as a base to hold my rub on and build it up.

(5) Left over brisket makes for great hot-beef sandwhiches


Sauces & Rubs

(1) Muddy's Pit BBQ Rub
(2) Muddy's Pit BBQ Sauce

Heat Source & Tools

(1) Basques Natures Own Charcoal 
(2) Nature's Grilling Wood Chunks (Hickory)
(3) Kamado Joe Heat Deflector
(4) Maverick Digital Thermometer


Wednesday, June 11, 2014

Product Review: Grill Grates


I'm one of those guys who at times can be very skeptical of new products, even more so when I see an 'As Seen on TV" logo slapped on them.. so you will have to forgive me when I say that I originally wrote off Grill Grates as gimmick product not for the serious griller… boy was I wrong

My change of opinion started as I patiently awaited the arrival of my Kamado Joe classic, even after purchasing it, I continued to read up on various cooking methods and accessories that paired well with a Kamado style BBQ, and over and over again Grill Grates would constantly pop-up in the articles I was reading… so naturally I decided to buy some and try them out for my self… here is what I found


Pros:

If you check out the Grill Grate site (HERE) they will gladly walk you through the science behind their product, but here I will keep it simple.. Grill grates amplify the heat given off of any BBQ and spread it out evenly over the grate system. This gives you perfect heat control and eliminates hot and cold spots.

The flat perforated bottom also prevents those dreaded flare ups yet still allows meats to be flame kissed. They team at Grill grates is not lying when they say that the juice/fat from your meats will be vaporized when it hits the grate and thus steaming back up into your meat, not lost to your coals.

When it comes to searing food, it is pretty impressive, and I think my pictures speak for themselves, these grates will leave you with perfect restaurant quality diamonds every time

I love that Grill Grates provide size options for both standard and round grills, the sheer amount of options they have listed can be confusing, but gladly they listed my grill make and model as part of their sizing, so no measuring was required.


Cons:

Not really a con, but what may hurt them a bit is pricing, many weekend warriors are running BBQ's that only cost them $300-$400 and to spend another $60-$70 on grates may be a hard sell.. well worth it mind you, but still a hard sell.

The grate tool that comes in the kits, is what I call a throw back tool, meaning simply it reminds me of those pictures of my grandfather in front of his BBQ with HUGE tongs and spatulas. In today's market size is not that important (yeah, yeah insert joke here) and I find that this big bulky took could using some serious downsizing (in the length and size of the handle).. that said it works as advertised for removing food from the grill and the cleanup afterwards.

The biggest drawback to most buying picking up a set of grill grates is sizing, either not knowing the size of their grill, being to lazy or unsure to check, and of course not finding the grate size that perfectly fits their particular grill. I will say that sizing is important, if you buy grates that are too small you will find that they slide all over your BBQ's current grades, and this is not only awkward but also frustrating. It would be nice to have a locking clip of some sort to ensure if your grill grates are not the perfect fit, they will still hold in place.. this goes for cleaning as well as cooking


 All in all, I love my grill grates, so much so that I have been already looking at buying some for Fathers day and/or Christmas presents for my Stepfather, Father in law and brother in law… if that's not an endorsement I don't know what is


Saturday, June 7, 2014

Kamado Joe - In search of the Perfect Pizza - Attempt #1


What a disaster, one of my main reasons for picking up a Kamado is my love of pizza, but so far I can tell this is going to be a challenge…

Pizza attempt #1 was kinda of rushed and not as home made as I would have liked. As you can see from the above image, the crust really puffed up on me and did not darken up as mush as I would have liked.. who wants a pasty white crust?

Learning's:

Don't buy store bought pizza crust, yes some stores sell fresh pizza dough, but how fresh, how well proofed and what they are made of will still be a mystery. I had a hard time stretching my dough, and it could have been because it was fairly cold, or it could have been over worked.

Do to my over working and the length of time I needed to stretch the pizza I used more flour then I would have hopped, and thus effecting the overall cook.

As for toppings I used fresh mozzarella (in water) I think this was a mistake as it released some water during the cook, wetting down the sauce. I also used a basic tomato puree with some fresh garlic. The sauce really could have used a boost as it imparted little to no taste

As mentioned above I kinda rushed into this cook, and although I heated the BBQ to 550 degrees, I did not leave the pizza stone on the grill long enough to properly heat up.. thus the crust cooked much slower then expected and I did not get that nice crunch and pull that I was looking for. It was almost bread like in texture.


Heat Source & Tools

(1) Kamado Joe (red bag) Charcoal 
(2) Kamado Joe Pizza Stone
(3) Kamado Joe Heat Deflector


Pizza attempt #2 will be posted soon, the results were better, but still not great


Tuesday, June 3, 2014

Kamado Joe - Smoked Split Chicken & Portobello Mushroom Caps


My second cook on my KamadoJoe was a split or butterflied chicken, with portobello mushroom caps.

Ingredients:

(a) 3lb Chicken
(b) Generous portion of your favourite rub (this bird was done with Montreal Chicken Spice)
(c ) 2-4 Portobello Caps (stems removed)
(d) 2-4 tablespoons Balsamic Vinegar

Step by Step

Chicken

(a) Split the chicken by cutting down both sides of the backbone to remove it.
(b) coat the inside of the bird with your spice rub
(c ) flip, press down to flatten and then coat the skin of your spice rub
(d) Cook over indirect heat for 1 hour or until done

Mushroom Caps

(a) remove the stems (if you haven't already done so at the grocery store to save some cash)
(b) use a spoon to remove the gills (the dark brown stuff)
(c ) place 1tbsp of balsamic in each cap
(d) cook at 350-375 for 10-15 minutes or until the balsamic is boiling away


Lessons learned/Tips:


Mesquite does not pair well with chicken, it had an overly smokey flavour and not the "kiss" I was hoping for. In future cooks I moved to Hickory and other less aggressive woods.

The use of a drip pan not only lessens clean-up but it avoids getting a singed or burnt flavour from the chicken fat burning at high temps.

Sauces & Rubs

(1) Montreal Chicken Spice


Heat Source & Tools

(1) Kamado Joe (red bag) Charcoal 
(2) Nature's Grilling Wood Chunks (Mesquie)
(3) Kamado Joe Heat Deflector